Chapter 11 - cMP software, sound reasons for coming out of a shell
The Windows XP shell, Explorer, is not optimal for the reproduction of music. cMP is a replacement shell focused on rendering high-quality sound while offering a clean look suitable for an audio PC. Explorer is not only the name of the Windows file-handling utility, it is also the shell where key parts of the user interface ¢ program management, Welcome screen, Taskbar and Desktop ¢ are presented.
Several replacement shells have been written over the years, most of which aim to reduce ExplorerÆs overheads and/or change its appearance. cMP is a replacement for Explorer that aims to maximise the quality of audio reproduction by reducing the runtime æfootprintÆ and thus motherboard activity in general. cMP improves audio performance through:
- not using the æWelcomeÆ screen (this must be manually done) and its associated bloat;
- preventing Taskbar processes from starting;
- making several low-level æruntimeÆ configuration changes which cannot readily be made by other means. Some are made when cMP is launched, others, such as the suspension of svchost and/or lsass, when a suitable music player is launched by cMP;
- optimising L1 Data & Instruction cache for audio. On a multi-processor platform, the Optimise > Critical setting locks the most critical audio thread to CPU1. Although the load on this is insignificant, the setting removes need for a real-time operating system;
- freeing up RAM;
- providing facilities for a touchscreen, remote control and library management.
cMP requires cue files to be defined for your music library. Important CUE SHEET directives are:
REM GENRE "Rock"
PERFORMER "Pink Floyd"
TITLE "The Wall 1"
FILE "Pink Floyd - The Wall 1.wav" WAVE
Where:
- REM GENRE is used for sorting your library by Genre
- PERFORMER is used for sorting your library by Artist
- TITLE is used to display your media in the form "Artist - Title"
- FILE is used to perform RAM loading - cMP only requires that the media file exists, i.e. any file type can be used as long as your player recognizes it.
Be sure to keep the directives in upper case.
Getting Started
Install cMP software as normal using the adjacent download link. The first time it's run, it starts Task Manager and displays a diagnostics window. Click OK to see a message noting No disks found. Please rip a disc and/or add folders to library in Settings. Click OK to see the main display. cMP has launched successfully.
General
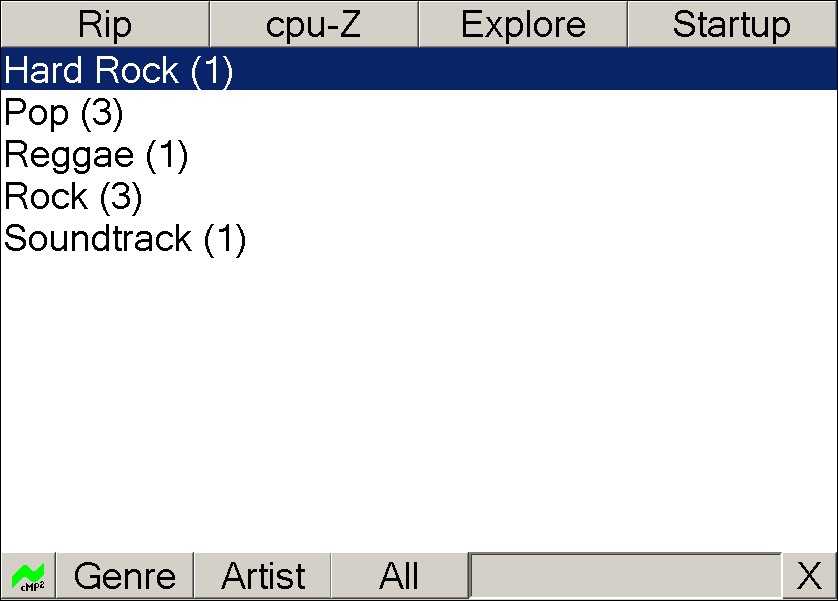
- Rip launches an onscreen keyboard. If a normal keyboard is preferred, connect it via the Alternate USB. Rip by default starts EAC (when it is installed and the default folder is used).
- Refresh (default function not re-mapped) scans all .cue files as per library folders (in settings) and presents using default sort.
- cpu-Z as shown is a re-map of Refresh which is explained below. In this setup, CPU-Z utility is started - take care to press this only once as cMP will start a new process on each press (i.e. be sure to exit the utility).
- Explore starts File Explorer (by default) showing the first library folder. Press Folders in tool bar for extended functions. Control Panel under æMy ComputerÆ gives full access to Windows settings. Using Windows File Explorer is the default setting which can be changed ¢ see below. cMP starts File Explorer when in cMP mode, otherwise starts Windows Explorer (in XP mode). In XP mode, process æexplorer.exeÆ must be killed (via Task Manager or Process Explorer) for cMP to reappear. NOTE that Windows is optimized for playback mode and some Windows functions will NOT work. After exiting File Explorer or Windows Explorer, cMP does a Refresh and re-initializes. This is useful when experimenting with settings.
- Startup runs the startup task as selected in Settings. This is often useful to access the utility if it was exited. If no startup task is setup, this button is disabled.
- Genre / Artist / All. Shows library using these sort preferences. For æAllÆ, a numbered list of all media is presented.
- cMP (bottom left icon) is used to access Settings.
- X performs shutdown or restart. Under diagnostics, either File Explorer (cMP mode) or Windows Explorer (XP mode) is started instead of actual shutdown or restart
Notes:
- RAM-loading occurs when it is enabled and enough RAM is available (check diagnostics).
- External tasks such as file management turn cMP into a background process and hide its display. When the task quits, cMP returns to the foreground.
- Changing shells requires a registry change. cMP performs this automatically.
- With diagnostics off, cMP pauses for 15 seconds to allow Windows to settle. Meanwhile, the userinit.exe process is shut down.
Understanding 'cMP Mode'
cMP operates in 2 modes, namely æstart XPÆ and æstart cMPÆ (done via settings):
- Pressing æstart XPÆ button sets Windows Explorer as shell. This XP mode returns to normal Windows operations after a restart. All setup activities must be done in XP mode as configuration tools in taskbar are not accessible in cMP Mode. If you plan to make any hardware changes (e.g. add a sync daughter card to your soundcard for clock input) then make sure you do so under XP mode. Switch to XP mode before shutting down to ensure Windows processes hardware changes on startup thus allowing for driver installation.
- Pressing æstart cMPÆ button sets cMP as shell. This cMP mode is the recommended mode to use with cMP. A scary warning is displayed. After hitting OK, and returning back to the main display, restart system (press æXÆ). ItÆs best to perfect setup in XP mode then switch over. Setting the shell requires a Windows registry change which is done by cMP ¢ no manual intervention required.
When exiting cMP, it checks if youÆre performing diagnostics. One of the following apply:
- XP Mode. cMP does not perform a shutdown (or restart) and instead reinstates Windows and starts Windows Explorer.
- cMP Mode. cMP does not perform shutdown (or restart) and instead reinstates Windows and starts FILE Explorer. To return, simply restart cMP by double-clicking the cMP Desktop icon (File Explorer > push 'Folders' button > Root node of tree is Desktop > Select Desktop > double-click cMP). If you exited File Explorer by accident: press Ctrl-Alt-Del > Task Manager > Run > Browse > locate & select cMP desktop shortcut > OK...
Only switch to cMP mode once sound card and other settings are completed. In cMP mode, all
configuration utilities as seen in the taskbar become unavailable. Of course you can revert back
to XP mode at any time to access these taskbar functions which are not needed for playback.
Settings

- Library (Default View). Tells cMP how to display the library in the main display. Note that flagged folders may contain sub-folders and these are also scanned for .cue files.
- Folders. Add launches a dialogue for adding folders to or press Remove to current folder selection.
- RAM Load. Enables or disables RAM loading. Regardless of setting, it will fail if not enough RAM is available. For cPlay, this setting must be "No". RAM loading only works when Windows memory management is setup for "System Cache".
- Startup. Tells cMP which utility, if any, to launch at startup. Once the system is stable, select None.
- Suspend. cMP can suspend hosted services (svchost) and/or security services (lsass) when the music player is launched and restore them when it quits. Most soundcard drivers work with hosted services suspended but the suspension of lsass rarely succeeds. Successful results have been obtained with cPlay and Lynx, RME and Juli@ soundcards. EMU cannot handle these suspensions. Test Suspend with Process Explorer running. If a suspension fails, the player goes into an indefinite wait state on starting play. To cure, select svchost and/or lsass in Process Explorer and perform Process > Resume. (Note that right-click does not work in Process Explorer if cicsRemote is running.)
- Optimise. Instructs cMP to perform various thread optimisations based on algorithms specific to the chosen mode. cMP persists in applying optimisations even if a player destroys and creates threads. Playing with Process Explorer running, a few (<3) context switches might be seen every second or two. This reflects cMPÆs monitoring and corrective actions. Different loads across CPUs may be apparent when experimenting: test various settings and select the optimum setting. Optimisations available are:
- Critical (default) ¢ the optimum setting for ASIO-driven soundcards.
- RealTime ¢ best for non-ASIO-driven soundcards.
- Player ¢ leaves thread optimisation to the player or Windows.
- Diagnostics. When Diagnostics is enabled, cMP provides useful information on the following events:
- on Startup, listing all running processes and, where cMP knows the process (e.g. winlogon), noting that appropriate optimisations have been applied;
- on Refresh, listing flagged music folders and .cue files. This is useful for checking that new .cue files have been correctly processed;
- on Play, listing RAM loading details, pertinent optimisations and errors after a play action;
- on Shutdown, listing active and reinstated processes.
- T.Screen starts the touchscreen setup utility usually with a view to calibrating touch points. The default points to the Zalman utility. On quitting the utility, cMP reappears.
- start XP switches to XP mode. Windows registry is changed to default XP shell setting.
- start cMP switches to cMP mode. Windows registry is changed. This is the purist way of running cMP. This mode only works if the Welcome screen is NOT used, otherwise Windows locks.
Remote Control
| Mouse Action | cMP | cPlay |
|---|
| Wheel Up | Navigate Up | Navigate Up |
| Wheel Down | Navigate Down | Navigate Down |
| Wheel Press | Navigate Forward or Play | Play Track |
| Wheel Press + Up | Navigate Top | Volume Up |
| Wheel Press + Down | Navigate Bottom | Volume Down |
| Wheel Double-Press | | Exit |
| Right-click | Navigate Forward or Play | Next |
| Wheel Press + Right-click | Navigate Back | Previous |
| Wheel Press + Left-click | | Exit |
| Button 1 | | Phase 0/180 |
| Button 2 | | Exit |
A remote control is available using a wireless mouse. It can either be used as normal (with left-clicking) or held in the hand like a remote control ¢ the most common commands are issued by controlling the wheel with the thumb (see table). Remore control is not available when using the CD-ripper or Explorer or when calibrating the touchscreen.
If Process Explorer or Task Manager is running, cMP must be the active window otherwise remote control actions are not performed. cMP works best in remote mode on its own and æAlways on TopÆ.
These remote actions are automatically defined for cPlay. Other players can also make use of cMP's Remote Control through setting up keyboard actions. Add keyboard shortcuts as follows (in foobar Preferences > General > Keyboard Shortcuts > Add New button):
- æ[Æ is Previous
- æ]Æ is Next
- æ;Æ is Phase 0/180 toggle
- Shift+Home is Volume Up
- Shift+End is Volume Down
- Alt+F4 is Exit
- Wheel Up / Down / Press requires player to correctly process Up, Down and Enter keys
These key mappings are essential for remote control when using other players.
Using other players and utilities
cMP can run with different players, touchscreen or other utilities and perform preparatory actions such as mounting a DVD or adjusting process affinities. The settings are in C:\Program Files\cics Memory Player\cicsMemoryPlayer.pth. The defaults settings are:
RIPPER #M "c:\program files\exact audio copy\EAC.exe"
CUE_PLAYER #N "c:\program files\cics Play\cicsPlay.exe" %C
LIBRARY_MANAGER "c:\windows\explorer.exe"
OSK "C:\Program Files\cics Memory Player\ahkosk.exe"
PROCESS_EXPLORER ōc:\program files\process explorer\procexp.exeö /p:n
EXPLORER_KILL "c:\windows\system32\taskkill.exe" /F /IM explorer.exe
TOUCH_SCREEN "c:\program files\touchkit\touchkit.exe"
PREP_PLAYER
REFRESH
Usage Notes
- RIPPER ¢ command path for EAC (or other ripper); Set #H (Hide), #M (Maximised) or #N (Normal) as shown
- CUE_PLAYER ¢ command path for the music player; Start with #H, #M or #N and end with
%C (cue) or %F (wav, flac, etc.) as shown. (Use #H if using .bat files to process play requests: cMP then runs the player with Normal Priority but otherwise runs with RealTime Priority.)
- LIBRARY_MANAGER ¢ utility for 'File Explorer' to display contents of Library folders
- OSK ¢ command for starting the onscreen keyboard. Do not use WindowsÆ osk software
- PROCESS_EXPLORER ¢ command for launching Process Explorer
- EXPLORER_KILL ¢ called to kill Windows Explorer (used in start XP mode only)
- TOUCH_SCREEN ¢ command for the touchscreen utility. Very useful for running other programs (like your soundcard's mixer) when not using a touch screen.
- PREP_PLAYER ¢ optional. starts with #H, #M or #N and ends with
%C or %F; the setting can be left blank but, if a command is included, it causes cMP to launch the target before the music player. This can be useful for preparatory operations such as mounting a DVD.
- REFRESH - optional. Maps Refresh button to another utility. Format:
"button text" "my program" <switches>
This maps Refresh to "button text" and calls "my program"... asynchronously, e.g.
REFRESH "cpu-Z" "c:\program files\cpu z\cpuz.exe"
Other comments:
- The quote marks and the first seven lines must be present or cMP exits. If there is no touchscreen, either leave the line at its default or use it to run a utility such as Process Explorer by calling T.Screen.
- If library_manager points to a file manager such as Xplorer2 or PowerDesk, hitting Explore in the main display while in XP Mode starts it instead of Explorer. This avoids having to ækillÆ Explorer on quitting the file manager.
- If Explore is hit in the main display, cMP processes the .pth file. This allows for easy experimentation with different setups.