
  |
CMP /
10SoundcardChapter 10 - Optimising sound cards Make changes only after soundcard installation and reading soundcard instructions. Generally, install cards as far as possible from the CPU and drives (the Gigabyte board is an exception). Step 1 disable mappingControl Panel > Sounds and Audio Devices > Hardware. Highlight the soundcard, right-click [Properties] Properties > Audio Devices. Highlight Soundcard > Properties. Check Do not map through this device. 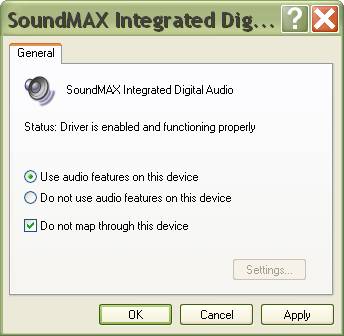
Step 2 disable system sounds & set maximum volumeControl Panel > Sounds & Audio Devices > Sounds TAB. Set Sound scheme to No Sounds. Set Volume to maximum in Volume TAB. Step 3 disable unused hardwareDisable soundcard-based non-audio hardware such as game ports: 
Example (Audigy 2 ZS Platinum) with game port and firewire 1394 disabled.
Step 4 disable unused audio functionsDisable inessential soundcard audio functions. Access the soundcards driver settings and disable all DSPs, DACs, soundfonts, etc as well as features like on-screen displays, balloon tips and infrared remote. Where appropriate, leave only pure (24/xxx) output. Step 5 use latest driversInstall the latest drivers but the drivers only tools are not required but can impact significantly on sound quality. Visit the suppliers website to obtain updates. Step 6 - ensure dedicated interrupt (IRQ)For PCI based cards, make sure the soundcard has a dedicated interrupt. 
Diagram shows mobo soundcard (SoundMAX) using IRQ 23 that is shared with USB. Only option here would be to disable the USB port.
Step 7 optimise ASIO buffersSet the playback output buffer settings for the smallest buffer size (the lowest latency) that does not affect stability, i.e. there are no dropouts, crashes or crackling.
Optimising USB DACs The plethora of USB DACs now on the market ranges from high-quality but expensive devices to others providing remarkably good sound for modest prices. Most low-end types are non-oversampling, scantily documented and lacking dedicated drivers though they usually work with ASIO4ALL. A serious drawback of USB technology is that it is often poorly implemented on motherboards. Where designers (charitably) must keep prices to consumer levels, they reportedly skimp on critical design parameters. Intel also notes that poor-quality power supplies degrade USB performance. It is generally systems laden with devices running at high speeds and/or drawing power from the motherboard that encounter the most severe problems. That scenario may not pertain to PC audio but it does illustrate common problems that do. Some simple steps can help to minmise their impact on sound quality, particularly on a dedicated audio PC. Try some or all of the following:
It is not claimed that the above steps will tranform the quality of an entry-level DAC but, taken together, they tend to make for more reliable performance and usually for better sound as well. |